How To Sync Klaviyo And Zendesk To Show The Full Customer Journey Alongside Your Tickets.
Klaviyo is a customer platform focused on building customer profiles by tracking a customer’s transactions, website events, text messages, emails, and more in order to understand audiences better and engage them in a more personalized manner. It gives us all the tools we needed to reach out to our customers in a personalized way – but we want to be reached back as well.
Adelante
Mar 8, 2023
Klaviyo is a customer platform focused on building customer profiles by tracking a customer’s transactions, website events, text messages, emails, and more in order to understand audiences better and engage them in a more personalized manner.
It gives us all the tools we needed to reach out to our customers in a personalized way – but we want to be reached back as well.
The problem we were facing was that customer queries would come into Zendesk and we would have virtually no information about the customer available. But we had a plethora of information in Klaviyo. So how do we sync up Klaviyo and Zendesk and utilize the data we collected to not only send personalized, targeted emails and products but to also offer better support?
There’s nothing more frustrating than reaching out to customer support and sending countless back-and-forth emails to provide information that you’ve already given them many times over.
We knew Zendesk had a way of tracking customer events via their Sunshine platform, but there were no available integrations to sync all customer data between Klaviyo and Zendesk.
So, using Make, we built our own bridge between Klaviyo and Zendesk Sunshine.
We created two automated workflows – one that syncs a customer’s profile as soon as they open a new ticket, and one that would check Klaviyo on a regular basis to bring in any new updates to Zendesk.
Summary
We’re using Klaviyo to collect data about customers through sign-up forms and track their journey (email and purchase/cart events).
We’re using Zendesk for customer support.
Our goal is to sync Klaviyo and Zendesk to display the customer’s complete journey alongside their tickets.
Klaviyo and Zendesk Workflow 1: Sync Klaviyo Profiles with Zendesk Sunshine when New Tickets are Created
The purpose of this workflow is quite simple – whenever a new ticket is created, we want to find the customer in our Klaviyo account and push all their latest data from Klaviyo over to Zendesk.
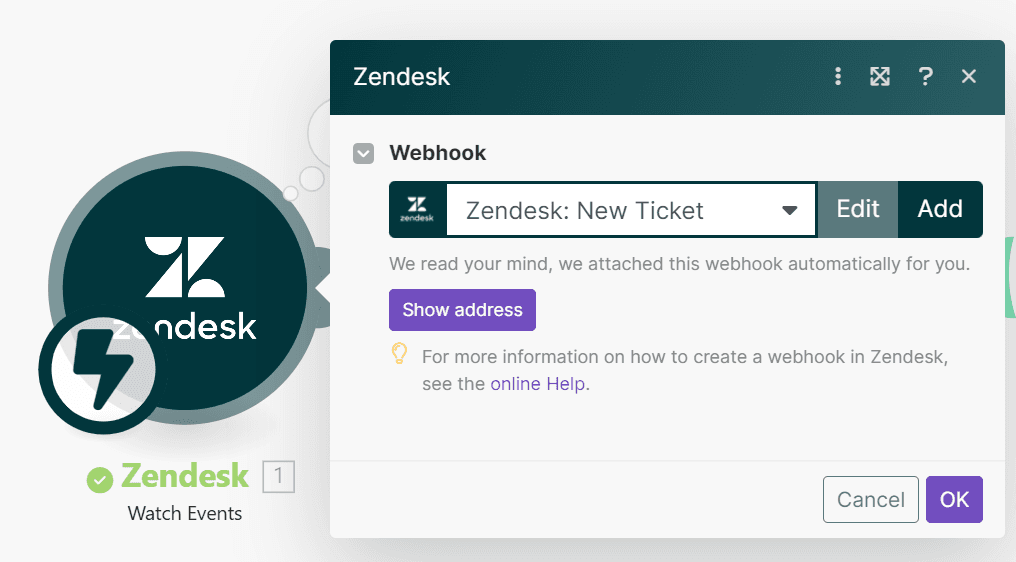
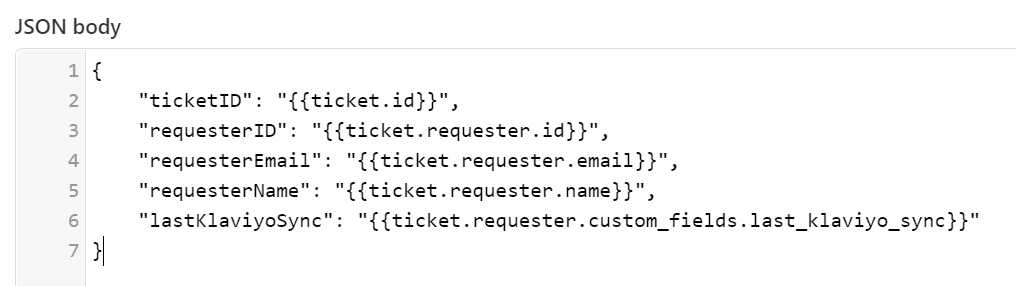
Step 1: Notify Make when New Tickets are Created
We started off by creating a trigger for new tickets directly from Make, using Zendesk’s “Watch Events” module.
This trigger sends a few different pieces of information required for this workflow:
ticket ID
requester ID
requester email
requester name
requester “Last Klaviyo Sync” date – a custom user field we created in Zendesk (People > User fields > Text field) to keep track of the last time we synced this user’s profiles
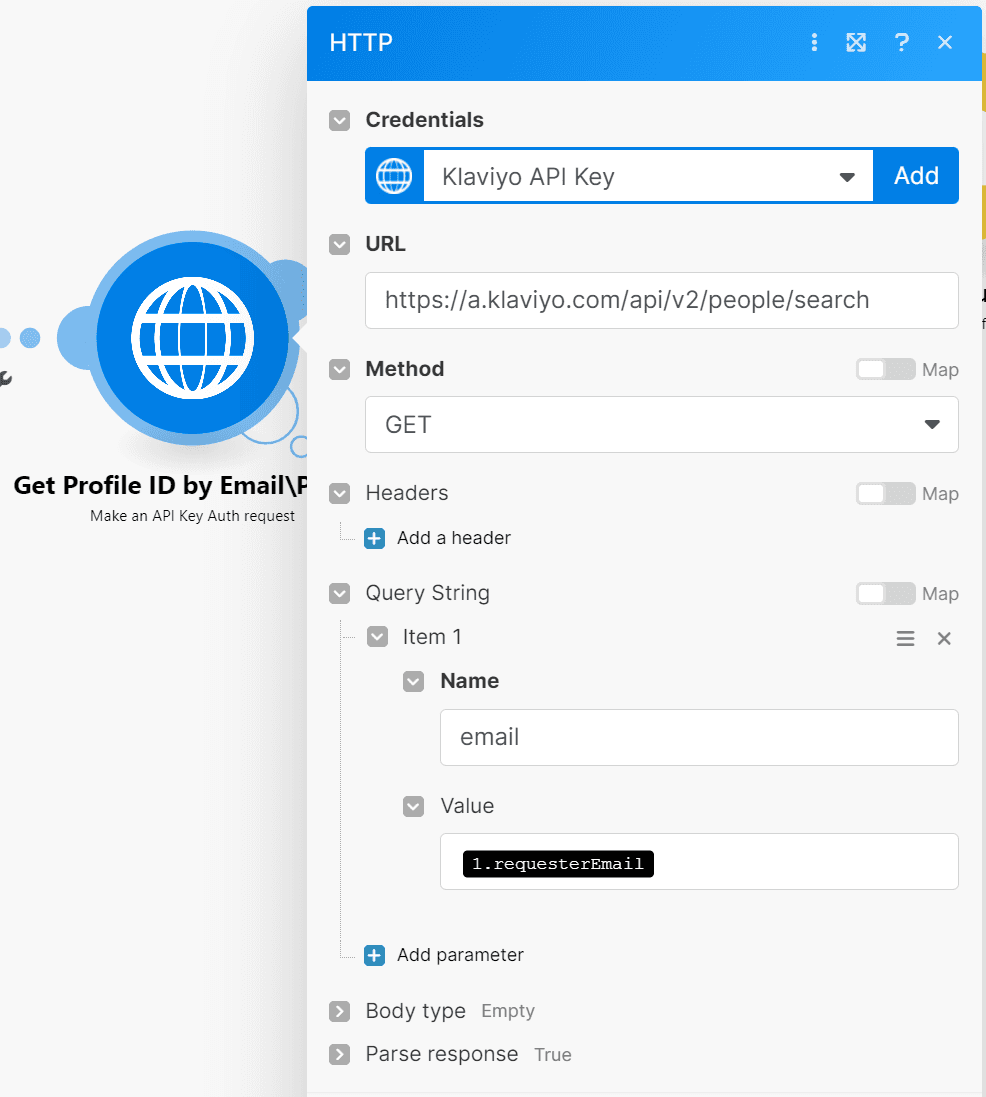
Step 2: Retrieve Customer’s Klaviyo Profile
Now that we have the customer’s Zendesk details, we want to find their Klaviyo and Zendesk profiles (if the latter exists). Finding the customer’s Klaviyo profile will enable us to search for their events and attributes in Klaviyo.
We used a custom HTTP call to find the customer in Klaviyo using their email address, which we received from the Zendesk trigger.
Step 3: Associate Customer’s Zendesk Profile with a Custom Klaviyo Profile
Next we’ll make sure the person has an associated Klaviyo profile in Zendesk Sunshine using the “Create or Update a Profile” module.
Zendesk tracks a user’s activity (such as ticket activity) in their “general” Zendesk profile which is reserved for built-in interactions by Zendesk. We created a custom profile called “Klaviyo” where we can keep track of the customer’s Klaviyo activity as well (see: Zendesk Sunshine custom profiles).
This module will either create a new custom profile for the user if one doesn’t exist, or it will update the existing profile if one is found.
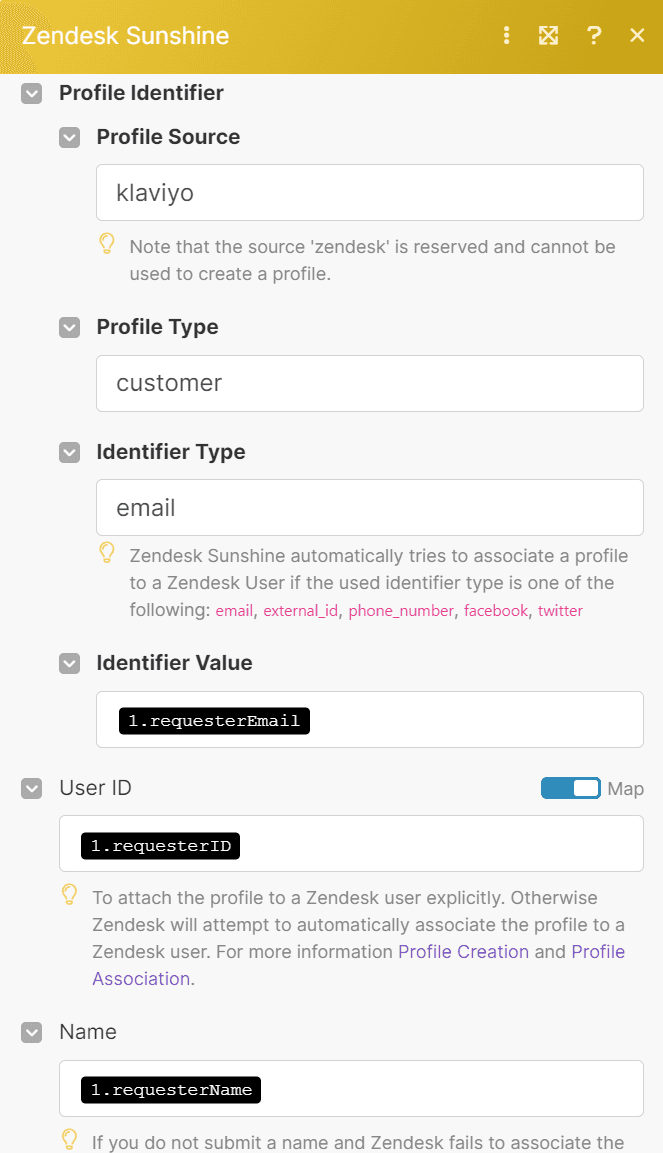
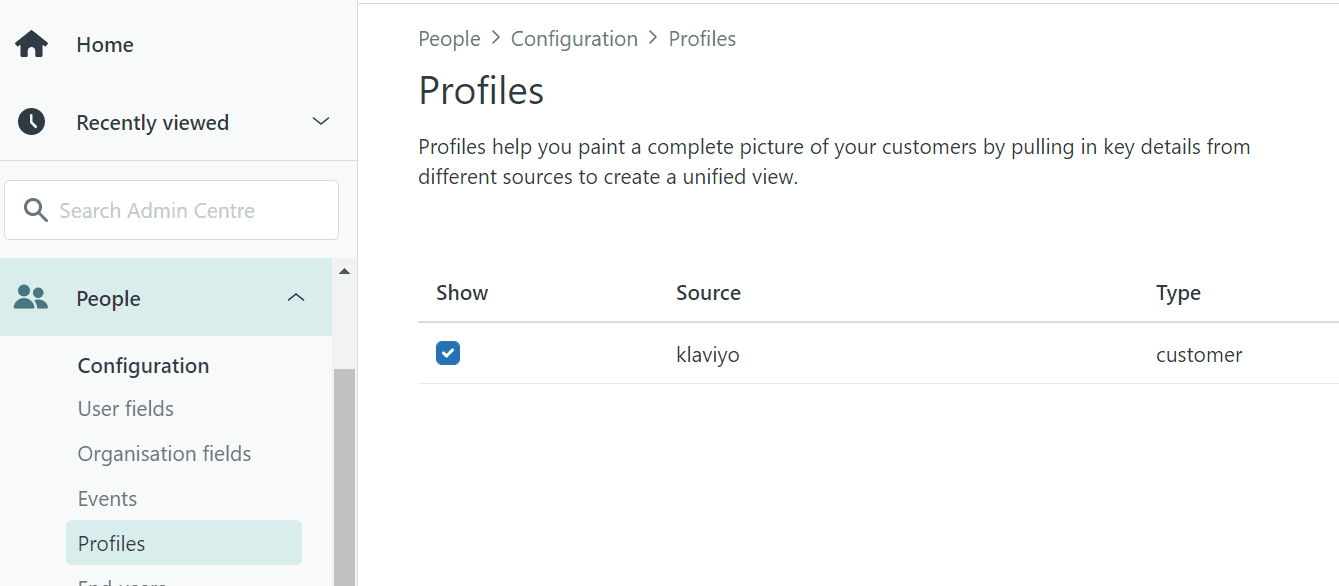
Note: While Source and Type variables can be dynamic (e.g. determined by a previous step in the automation) instead of static (e.g. always “klaviyo” and “customer”), every time a profile with a new source or type is created in Sunshine, you will need to manually enable it in Zendesk.
You will see the profile show up in the Admin Centre under People > Profiles, and here you can check the box to “Show” this profile in Zendesk.
Step 4: Get Customer’s Klaviyo Events and Attributes
Now that we know the customer has a profile we can pass events to, we can go ahead and pull their events and attributes from Klaviyo and pass them one by one to Sunshine.
We’ll start by using another custom HTTP call to Klaviyo’s endpoint Get Profile’s Events for all Metrics:
Since there are some limits applied to API requests, we’ll limit our search to a maximum of 100 events/attributes sorted ascending by date of event, and we’ll further filter this list to only include events that happened after the date stored in the custom field “Last Klaviyo Sync”.
This will ensure we don’t pass duplicate events to Sunshine, as well as always having the most recent list of events for the user.
To achieve this, we will add the following items in the “Query String” section:
Name: count
Value: 100Name: sort
Value: ascName: since
Value: if(lastKlaviyoSync = null; ignore; formatDate(lastKlaviyoSync;X))

Step 5: Update Last Synced Date in Zendesk
Before we continue with the events we just received – remember the custom user field we created in Zendesk to track the last time we copied events from Klaviyo to Sunshine? We’ll update this field now, and you may be wondering “why now?”
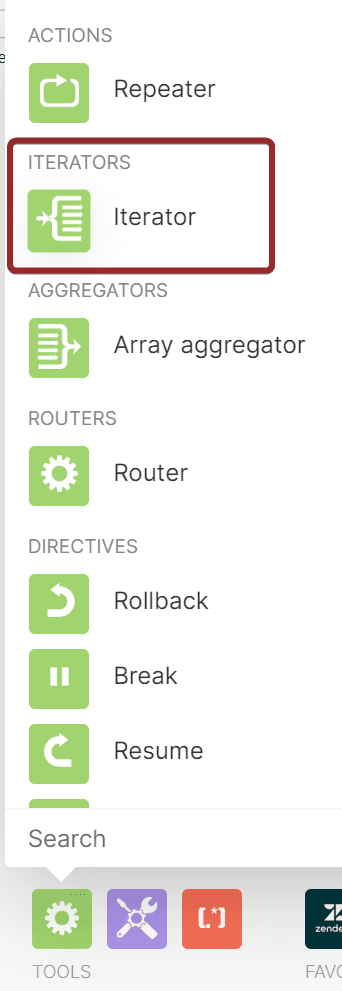
The previous module will provide us with a list of up to 100 events from Klaviyo in the form of an array of items. To process these items (events) one by one, we will use one of Make’s tools called Iterator and iterate through the events.
All actions we place after the iterator will run for each event (up to 100 times), but we don’t need to update a user’s last sync date 100 times, so we will run this update before the iterator.
For the update module, we’ll use Zendesk’s “Make an API call” module with the following settings:
URL: /api/v2/users/<REQUESTER_ID>
Method: PUT
Body:
{
“user”:
{
“user_fields”: {
“last_klaviyo_sync”: “{{formatDate(now; “YYYY-MM-DDTHH:mm:ssZ”)}}”
}
}
}
Step 6: Copy Klaviyo Events to Zendesk Sunshine
Now that the sync date is updated, we’re ready to process events individually. The iterator module is found on the left side of your app list, by clicking the green cog icon.
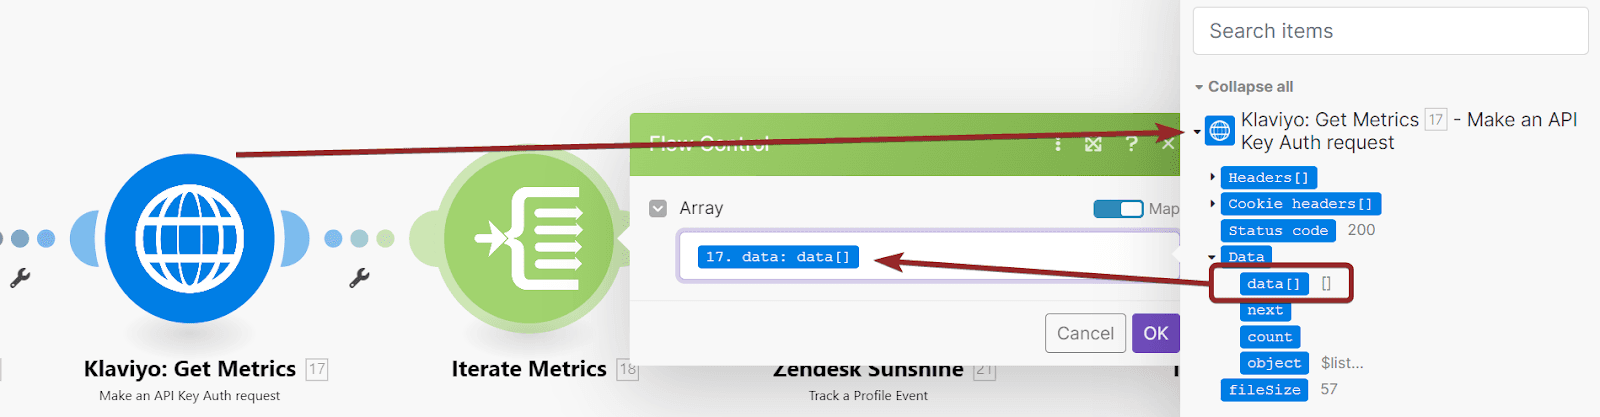
Map the array from the custom HTTP call for getting Klaviyo events into the iterator.
If you don’t see the array as an available variable, right-click on the HTTP module and choose “Run once” (you will need to provide any customer’s Klaviyo ID to test the module).
Finally, we’ll add Sunshine’s module “Track a Profile Event” which we’ll use to copy the event into Sunshine.
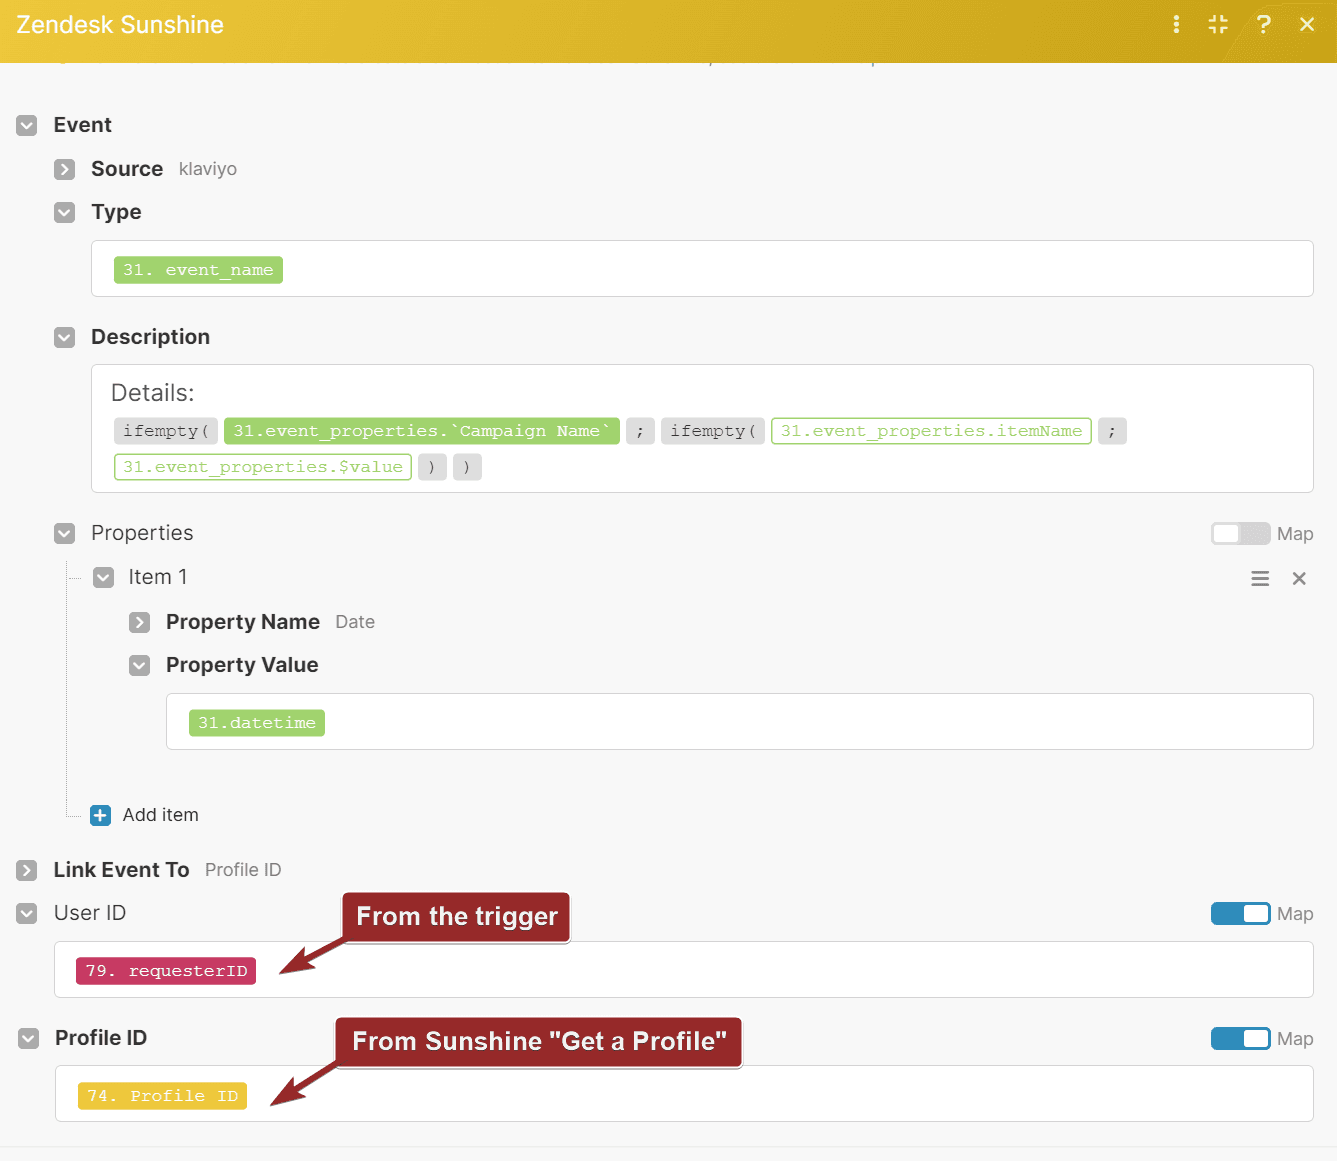
You’re free to customize the contents of this module as your choices here determine how events will be displayed in Zendesk’s user profile, however, bear the following in mind:
Source should be the same as the one used in the previous step for creating/updating the customer’s profile.
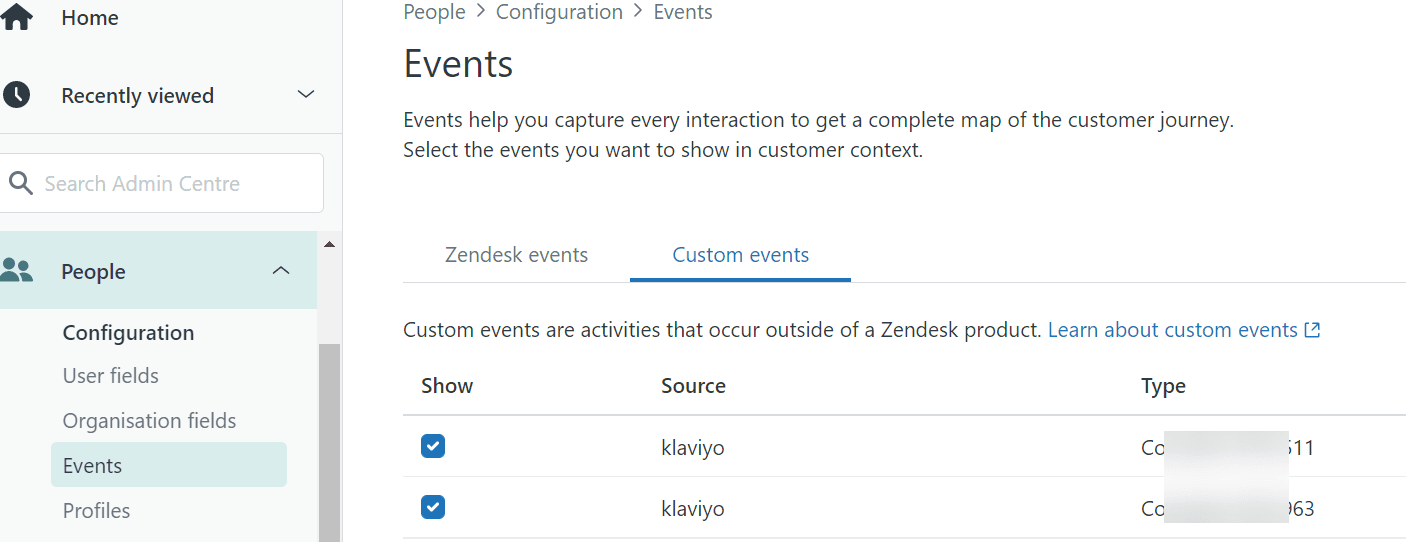
The Type variable can be dynamic (for example, we use the event name from Klaviyo), however similarly to profiles, every time events with a new source/type are added to Sunshine, you will need to manually display them in Zendesk.
You can do this in the Admin Centre, under People > Events > Custom Events tab.
Klaviyo events store details of the event in different variables, depending on the type of the event.
For example, email-related events store the email’s title in the “Campaign Name” variable, while order and checkout-related events store the product’s name in the “ItemNames” variable (see: Native Klaviyo metrics & attributes).
We used a few “ifempty” formulas to ensure we’re always getting the appropriate variable we want, but you can customize this as you like.
Note, however, that the description cannot be empty.At least one “Property” is required when creating an event in Sunshine. We chose to simply pass the date/time of the event between Klaviyo and Zendesk, but you can use these properties to pass as many additional details on the event as you’d like.
And we’re done! We have Klaviyo and Zendesk working toegther to show all the stored customer data when we open a ticket.
Klaviyo and Zendesk Workflow 2: Sync New and Updated Klaviyo Events on a Schedule
The first workflow we covered is set to trigger immediately when new tickets are created, however, this workflow does not continuously update the customer’s profile during the course of the conversation.
We found it to be useful to also have a workflow that would simply sync all Klaviyo profiles on a regular basis, to ensure that our data in Zendesk is always kept up to date. The schedule we chose for this workflow was every 6 hours, but you can customize this to your preference.
While the workflow is very similar to the previous one, there are a few changes that we will cover below.
Step 1: Segment Recently Created and Updated Profiles in Klaviyo
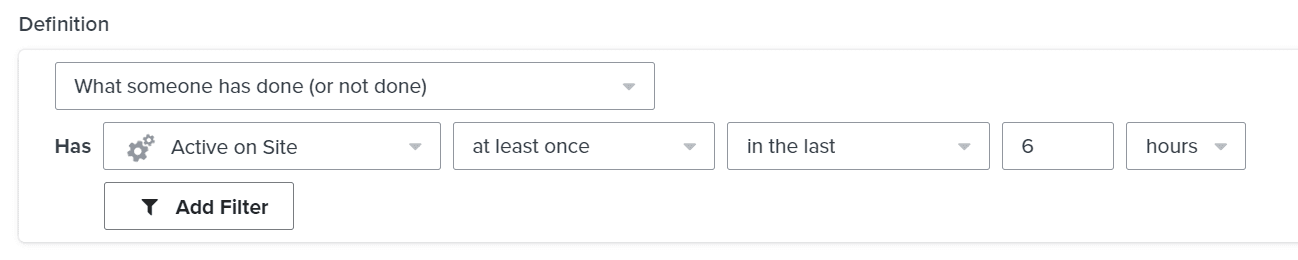
To prepare for this workflow, we first created a new segment in Klaviyo which would capture all profiles that have been created or updated since the last time our workflow ran.
We used the following condition for the segment, but you can further customize it to your liking:
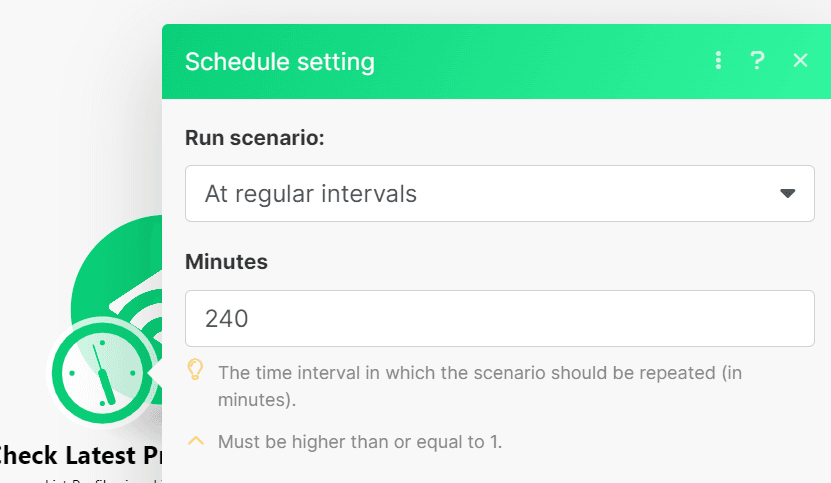
In Make, we used Klaviyo’s “List Profiles in a List or in a Segment” module to grab a list of all profiles in this segment, and we scheduled the module to run every 240 minutes/6 hours.
Step 2: Associate Customer’s Klaviyo Profile with a Zendesk User Profile
Unlike the module we used to list events in the previous workflow, the module we’re using as a trigger will not return the profiles as an array of items, but instead as separate bundles. Because of this, we do not need to use an iterator module after the trigger – all steps after the trigger will run for each profile.
Since the trigger doesn’t provide us with the customer name, only their profile IDs, emails, and phone numbers, we’ll first use Klaviyo’s “Get a Person’s Attributes” module to get this information for each person.
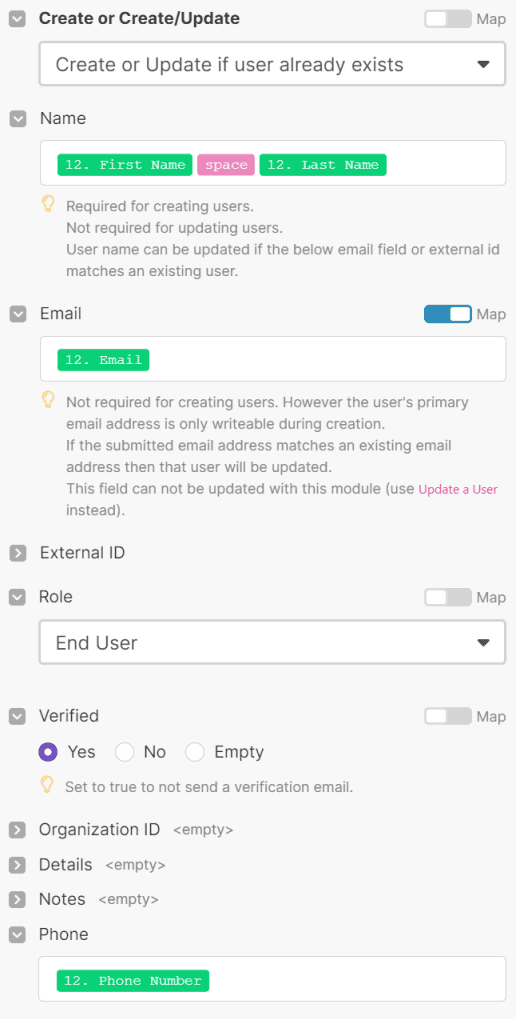
Next, we want to ensure our Klaviyo customers exist in our Zendesk helpdesk, and we’ll do this by using Zendesk’s “Create or Update a User” module. Using the results from the previous Klaviyo module, we’ll map the user’s name, email, and phone number to their Zendesk account.
Step 3: Copy Klaviyo Events and Attributes to Zendesk Sunshine, Update Last Synced Date
From this point on, the workflow is very much the same as the previous one.
Add Sunshine’s “Create or Update a Profile” module to ensure the user has an associated custom profile for Klaviyo events in Sunshine
Use an HTTP module to get the list of customer’s Klaviyo events – Klaviyo profile ID is available from the trigger, and the custom field “Last Klaviyo Sync” from Zendesk’s create/update user module
Use Zendesk’s “Make an API call” module here to update the last sync date
Iterate through the events with Make’s Iterator tool
Create events in Zendesk Sunshine using the same settings as in the previous workflow
And we’re done! We have Klaviyo and Zendesk syncing automatically on a regular schedule.
If you’d like to find out more about our Klaviyo and Zendesk integrations, or about integrating any other tools with Zendesk, get in touch.